Wednesday
Aug062008
How-To #1, Terminus; The Life And Times Of A Sketch Card
I've been asked many times how I do my Sketches and what I use. So, I've decided to put together a "How I Do It" type of post. I've been lucky enough to get full approval from Marvel Comics and Rittenhouse Archives to post this using an upcoming Fantastic Four Sketch Card. Thanks to them enjoy.
(Click on the thumbnails for larger image)

This is the classic comic book method. Although I use different styles and techniques for others, the majority of my cards are drawn this way. As far as subject matter, I do put a lot of thought before hand on what I'm drawing. I try to keep every card interesting and also relate each card to the rest of the sketches I'm doing. Yes, portrait cards are easier, but lets face it, they're pretty boring so I try to keep them to just a few and usually only with characters that I will be drawing multiple of. Variety is the way to go but it does take longer.
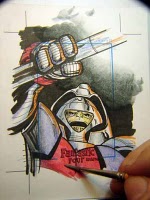
1) I start out lightly using a very dull hard lead pencil to rough out the basic forms and layout. These light lines are so much easier to erase when you screw it up or come up with a better composition. I don't use blue line pencils here because it's a finished piece of art and the blue pencil doesn't erase well.
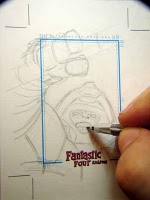
2) Moving to a softer and sharper lead, I tighten up the lines and details I need to see better. That usually entails, facial features, fingers, little odd whatsit's. I do find as I get better at it and more confident, I need to do less at this stage and go right into inking it which is great time wise. (I did most of the lines here in pic 2 just to show it better.)

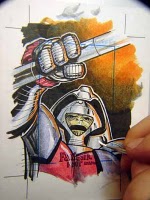
3) I use Black India ink and pens with a comparable quality ink to keep the image strong and fade resistant. I try to use the brush as often as I can to give it a more natural feel and it's much quicker putting down blacks. I look back at some earlier sets and find the sketches that stand out have more black in them. Using the brush also helps remind me of that and I find myself slapping the black down more now.
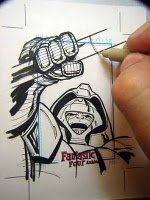
4) I use the pens to get in those little details in that make it bit more visually interesting. On the whole, I try not to use markers if I don't have to. I put a lot of time into these cards and I would rather they didn't fade 10 years down the line.
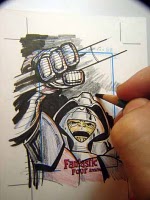
5) After the inkings done, I start putting down the base colors. I've found that watercolor pencils are awesome for this. They're fast, can cover a wide area or a fine one, and they blend with each other really well when you water them. I have a large stash of black watercolor pencils and use them for the dark areas and shadows.
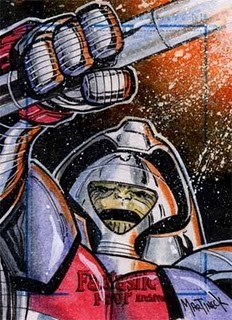
6) Blending in the colored pencils is the fun part. Most of the time I use just straight water, but where I want a stronger color, I will blend them with a dye instead. I use Dr. Ph. Martins for this as they're great for an almost radiant color. Yin and Yang. The dark shadows blended right into a vibrant dye... sweet.
7) It really comes down to layering. That's what makes it pop and gives the sketch depth and a completed feeling. To finish it off I go in with some Graphic White for highlights, halos, cover mistakes, or whatever. The Graphic White actually pulls the color through from the dyes which makes for a less stark transition. On the Terminus card, I splattered GW with a toothbrush for the blasting effect from his almighty staff. That's also a great technique for space scenes.
There it is in a nutshell. (a really big nutshell)
Thanks to all for the emails and kind words, hope this was interesting and informative for you.
Now I need to stop talking about it and sit down and do it.
Later
WM
 Warren Martineck